The Old Windmill

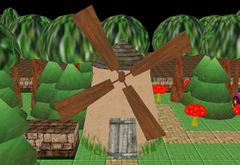
The Old Windmill is a windmill seen in Wonderland Secret Worlds (as well as its remake in Stinky and Loof in Wonderland). Stinky remarked that it is broken upon his first visit there. It also bears similarity to Jedlic's Windmill in Wonderland Adventures, though it's unknown whether they are the same, or if otherwise, who the owner of this windmill is.
Wonderland Secret Worlds level
The similarly named level featuring the eponymous windmill is a secret Rainbow Stars level, accessible from the southwest corner of Wondertown. There is a green teleporter inside the windmill that connects with passages to its southeast, blocked by boulders.
Walkthrough
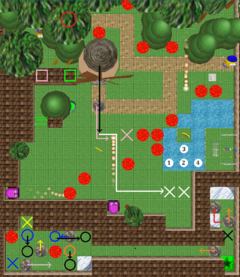
Four water tiles must be bridged to access the exit and all keys (note that the tile on the rightmost wall is an X-tile and unaccessible). The key in the middle of the level plays an important role in stopping boulders, and should not be collected until all the bridges are complete.
Due to a technical glitch in the SnL remake, the collision of boulders in the lower-right corner (step 5) may result in their mutual destruction, which would make the solution unsolvable, in which case the game must be restarted or reloaded from an earlier save point.
- Let Stinky follow the brown tiled path to the top-left region, collecting a key (red circle) within the trees.
- Run back immediately to the front of the windmill, and let the cannon destroy the chasing Chomper. Now move aside to a safe spot (e.g. to the right of the green button).
- Switch to Loof and collect the three bonus coins. Locate the two hidden steel boxes, push the right one (green) onto the green button and the left one (pink) down beyond the willow tree, then to the pink "X" in the middle of the level. Do NOT collect the key here.
- Push the boulder in front of the windmill down and right, following the pink arrow.
- Take Loof into the windmill and through the green teleporter. Walk up and push the boulder above you up (orange arrow), then immediately retreat and push the lower boulder left into the side passage.
- At this point two things can happen here: either (a) the boulders collide and one of them rolls towards the green teleporter, or (b) the boulders collide and destroy each other (which would need a restart).
- Guide Loof to the passage to the left. Slide down the ice, push a boulder up (yellow arrow) and then stand on the yellow "X".
- Take Stinky through the green teleporter and to the left-side chamber. Move to the upper-right corner and push the boulder to the left once (dark blue arrow), which would move both boulders (dark blue circle positions). Then move to the dark blue "X" in the other corner and wait.
- Switch to Loof. Push three boulders following the black arrows. Then move to the black "X" directly above the teleporter.
- Switch to Stinky. Push the right-side boulder to the right (grey arrow), then walk around to stand to this boulder's left side (orange circle) and push it right into the passage.
- Switch to Loof, and push the arriving boulder below you down into the teleporter.
- There are now three boulders outside the windmill. Take Loof through the teleporter, and push all three boulders following the white arrow until they form up at the white "X"s.
- Push the second boulder to fill the white circle "1" and the other two boulders to the white circle "2".
- Take Loof back through the teleporter and wait at the black "X" again.
- Switch to Stinky. Push the remaining two free boulders (one-by-one) down to the bottom row, right along the ice curve, then right into the passage.
- Switch to Loof, push the two boulders down into the teleporter, then follow through and push them along the white arrow. Push the second boulder to fill the white circle "1", and the other to the white circle "3".
- Switch to Stinky, locate the last boulder in the smaller room directly above the teleporter, and push it along the red arrow, where it too will move through the teleporter.
- Switch to Loof, and push the last boulder along the white arrow to fill the white circle "3". Collect both remaining keys.
- Use the two steel boxes to complete the bridge at the white circle "4", and exit.
