Blast Through!
| Blast Through! | |
 | |
| World | The Halls of Undermountain |
| Playable Stinkers | Stinky, Loof |
| Rainbow Coins | 7 |
| Bonus Coins | 4 |
| Time | 5:00 |
| Texture | Cave |
| Background | Walls |
| Music Track | Track 4 |
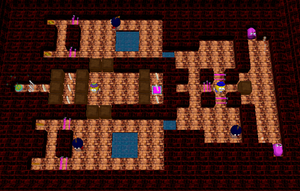
Blast Through! is the fifth level in The Halls of Undermountain. It requires Stinky and Loof to box in Kaboom!s to collect the rainbow coins beyond.
Walkthrough
Only Loof can start boxing in certain Kaboom!s in order to free Stinky from beyond the gates. But before the button can be pressed to free Stinky, it's best that Stinky goes around the Scouge room avoiding the fire so that the wooden box is in front of the gates, and Stinky is behind it. This is for Stinky's safety when Loof pushes the button before setting up the second Kaboom! box-in.
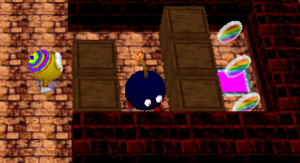
With Loof, weave through Kaboom! pathing while pushing the boxes and setting up a clear path to the button. Push one box against the wall towards the blocked button (but not against the corner), then another in the centre of the hall and adjacent to the box you just positioned. Wait until a Kaboom! enters the boxed dead end to box it in and free three rainbow coins and the button (See first below image). Make sure the second Kaboom! is not in between any pink gates when pushing the button, it will be stuck circling one of the lone walls. This can easily be fixed by placing a box against the wall (but not corner of the bonus coin) to get the Kaboom! back on track.
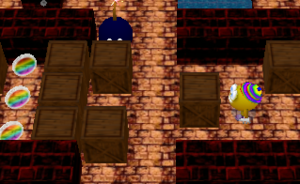
While continuing to keep Stinky in place, use Loof to box in the second Kaboom! on the west side to the first box barricade to the exit. You will need to use the other free boxes for the second one. Once in place, use a second free box to blow up the second Kaboom! (see second below image).
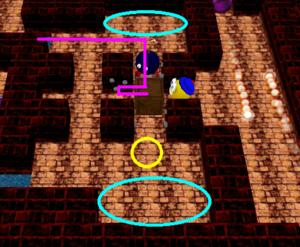
Boxing in the final Kaboom! from Stinky's section will be difficult. It may take several tries to get correct since it wanders around Stinky's starting point. And when it the Scouge room, it's gone. This assumes Stinky's box is blocking all three gate passages from the Kaboom!.
- Ensure Loof collects the second trio of coins from the second destroyed barricade, and pushes the last two boxes into the corners Make sure Loof is in a fairly safe place before the last Kaboom! enters the room.
- Immediately after the last Kaboom! turns back on the southern blocked passage and wanders around the southern half of Stinky's section, push Stinky's box one space west and move Stinky around the north side of the room to push the box back in place.
- Avoid the Kaboom! in the area until it makes another circle back to when you started pushing the box (Southern gate). After it gets out of the way, immediately push the box in the northern water hole to ensure the Kaboom! is safe from Scouge fire.
- Keep Stinky near the water where you formed the bridge for the Kaboom! while keeping Loof near the third box-in setup. Wait until the Kaboom! comes around to box it in and collect the last coin for the exit.
Before entering the exit, the four bonus coins can easily be collected.


