Separation Anxiety
Jump to navigation
Jump to search
| Separation Anxiety | |
 | |
| World | Desert Cities |
| Playable Stinkers | Stinky, Loof |
| Rainbow Coins | 5 |
| Bonus Coins | 0 |
| Time | 10:00 |
| Texture | Sand |
| Background | Flat |
| Music Track | Track 3 |
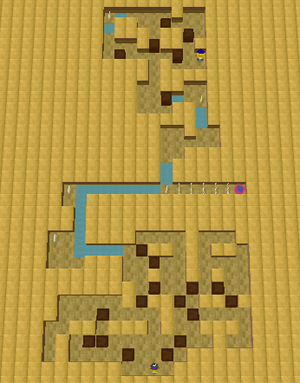
Separation Anxiety is the third level in Desert Cities. Each Stinker has their own section and both need to reach the exit by pushing the boxes in their area into water while dealing with tight rooms and passages.
Walkthrough
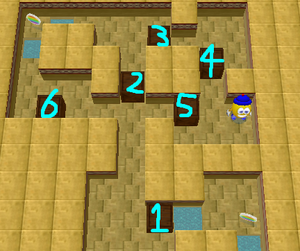
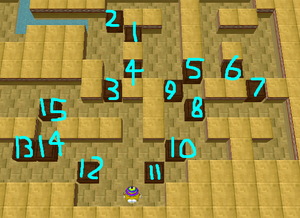
Note: All boxes need to be placed into water in order for both Stinkers to get to the exit. Getting just one box stuck will require a reset of the whole level. It is recommended to do Loof's section first as it contains more boxes and more room for error. Refer to the images below for numbered box indicators used in the walkthrough.
Stinky's Section
- Go around through the northeast, north-centre, and south rooms. Boxes 2, 3, and 4 can be pushed but must be put back to their initial positions after passing each room. Head for Box 1 and push it into water. Collect the coin before moving on.
- Repeat the roundabout back to the start point and the same rooms. Keep Boxes 3, 4, and 5 in their intial state as you push Box 2 into water (beyond the collected coin).
- Go through the rooms in the previous step again, keeping Boxes 4 and 5 in their place after passing them. Push Box 3 into the water passage.
- Once more, go around Box 5 and push Box 4 into the water passage.
- Now that the rooms are clear from obstructions, push Box 5 into the water leading to the northwest coin.
- Push Box 6 into the water passage, while carefully going around the empty rooms to push it in the proper hallways.
Loof's Section
- Push Boxes 11, 10, and 8 one space north each as you get through their passage. Push Box 9 two spaces north and leave it there. Push Box 1 two spaces west and one north. Go around the north path and push Box 2 one south. Push Box 1 into water.
- Push Box 2 north one space, go around the north path to push it back one, and backtrack the path to push it west and into water.
- Head to Box 3 from the south side though the open passage at the start. Push Box 3 three spaces north, go around the push it into water.
- Push Box 4 west, go around the starting passage and push it north two spaces. Go around the north area to push it into water.
- Go to Box 7 from the south side and push it two spaces north. Go to Box 5 from the east side and push it all the way west, into water.
- Push Box 6 all the way west, around the north area and into water.
- Push Box 7 south one space, all the way west, and into water the same way as Box 6.
- Push Box 8 (which should be one space north from its initial position) north against the wall, and into the water the same way as before.
- Push Box 9 (two spaces north from initial position) south two spaces, go around and push it north one space, and west into water the same way.
- Push Box 10 north and west into water the same way as before.
- Push Box 11 east one space, and the same way as Box 10 into water.
- Push Box 12 north one space, east four spaces, and as the same way as previous into water.
- Push Box 15 two spaces west, Box 14 two spaces north, and push Box 13 a same intuitive way as Box 12 into water.
- Push Box 14 two spaces south, and the same way as previous into water.
- Push Box 15 two spaces east, then two spaces south, and the same way as previous to water, and open Loof's way to the exit.

