Gateway to the Rainbow World: Difference between revisions
(Removed the solution seen on the MS website to avoid redundancy with the updated solution) |
|||
| Line 14: | Line 14: | ||
==Walkthrough== | ==Walkthrough== | ||
Immediately switch to Qookie and push the right-most Powder Keg into the [[water]]. Otherwise, a [[Scouge]] will blow up the kegs and kill Loof and Qookie. Push the remaining kegs into the water switching between Loof and Qookie as needed taking care not to have the kegs destroyed by the Scouge. Move one Stinker across the bridge and have them push the Wooden Box all the way down and enter the alcove. Switch to the other Stinker and have both Stinkers push the box into the water. Push the other box into another pool of water then go across a collapsible [[bridge]] and collect a pair of Bonus Coins before collecting the Rainbow Coin on the red teleporter. Collect the other pair of Bonus Coins if they haven’t been collected already and switch to Peegue. | Immediately switch to Qookie and push the right-most Powder Keg into the [[water]]. Otherwise, a [[Scouge]] will blow up the kegs and kill Loof and Qookie. Push the remaining kegs into the water switching between Loof and Qookie as needed taking care not to have the kegs destroyed by the Scouge. Move one Stinker across the bridge and have them push the Wooden Box all the way down and enter the alcove. Switch to the other Stinker and have both Stinkers push the box into the water. Push the other box into another pool of water then go across a collapsible [[bridge]] and collect a pair of Bonus Coins before collecting the Rainbow Coin on the red teleporter. Collect the other pair of Bonus Coins if they haven’t been collected already and switch to Peegue. | ||
Have Peegue roll the Boulder on his left and collapse the nearby bridge. Roll the two boulders into the water. Next, push the Steel Box in Peegue’s starting area to just below the pool of water and the other Steel Box to the right into the corner. Collapse the bottom part of the bridge to the left of Peegue’s [[Rainbow Gate]] then roll the top-middle Boulder left and up into the water and the bottom-middle Boulder up, left, and up. Collapse the rest of the bridge and roll the remaining Boulders into the water using the [[ice]] and Steel Boxes. Have Peegue collect all of the coins on his side and then switch to Stinky. | Have Peegue roll the Boulder on his left and collapse the nearby bridge. Roll the two boulders into the water. Next, push the Steel Box in Peegue’s starting area to just below the pool of water and the other Steel Box to the right into the corner. Collapse the bottom part of the bridge to the left of Peegue’s [[Rainbow Gate]] then roll the top-middle Boulder left and up into the water and the bottom-middle Boulder up, left, and up. Collapse the rest of the bridge and roll the remaining Boulders into the water using the [[ice]] and Steel Boxes. Have Peegue collect all of the coins on his side and then switch to Stinky. | ||
[[File:GttRW Stinky's Solution.png|thumb|Infographic for Stinky's section]] | [[File:GttRW Stinky's Solution.png|thumb|Infographic for Stinky's section]] | ||
Stinky | Stinky will need to position Wooden Boxes so that they hold down several buttons. The initial positions of the boxes are shown in the infographic. The buttons (with their respective colors) are represented by the circles; the boxes are numbered 1 to 7, with their intended destination colored by font. Stinky's moves should be as follows: | ||
# Walk through right conveyor (B). Push box 4 up two tiles, then box 5 onto yellow button. '''Box 5 is set'''. | # Walk through right conveyor (B). Push box 4 up two tiles, then box 5 onto yellow button. '''Box 5 is set'''. | ||
| Line 35: | Line 31: | ||
# Push box 6 down two tiles onto the red button. '''Box 6 is set'''. | # Push box 6 down two tiles onto the red button. '''Box 6 is set'''. | ||
# Cross the left collapsible bridge (C), enter via right conveyor (B), then push box 4 up and left onto the cyan button. '''Box 4 is set'''; '''Box 7 didn't need to move'''. | # Cross the left collapsible bridge (C), enter via right conveyor (B), then push box 4 up and left onto the cyan button. '''Box 4 is set'''; '''Box 7 didn't need to move'''. | ||
[[File:GttRW Stinky's Boxes.png|thumb|Stinky in the middle of using the alternate solution]] | |||
If, by step 4, both collapsible bridges are (somehow) collapsed, then Stinky must follow a longer route | If, by step 4, both collapsible bridges are (somehow) collapsed, then Stinky must follow a longer route as follows: | ||
# <li value="5">Push box 6 right two tiles, and box 7 left one tile.</li> | # <li value="5">Push box 6 right two tiles, and box 7 left one tile.</li> | ||
# Push box 3 right two tiles onto the white button, then box 4 up one tile. | # Push box 3 right two tiles onto the white button, then box 4 up one tile. | ||
| Line 48: | Line 44: | ||
# Push box 6 right two tiles onto the blue button. '''Box 6 is set.''' | # Push box 6 right two tiles onto the blue button. '''Box 6 is set.''' | ||
# Push box 2 down two tiles onto the red button. '''Box 2 is set.''' | # Push box 2 down two tiles onto the red button. '''Box 2 is set.''' | ||
If either of these solutions have been followed correctly, all the gates should be open. Step onto the [[Conveyor Belt|conveyor]], collect the final Rainbow Coin, and have all four Stinkers exit through their respective Rainbow Gates. | |||
{{ReturnToWonderlandLevels}} | {{ReturnToWonderlandLevels}} | ||
[[Category:Return to Wonderland Levels]] | [[Category:Return to Wonderland Levels]] | ||
Revision as of 00:47, 14 August 2023
| Gateway to the Rainbow World | |
 | |
| World | Secret Passages |
| Playable Stinkers | Stinky, Loof, Qookie, Peegue |
| Rainbow Coins | 3 |
| Bonus Coins | 6 |
| Time | 15:00 |
| Texture | Jade |
| Background | Walls |
| Music Track | Track 6 |
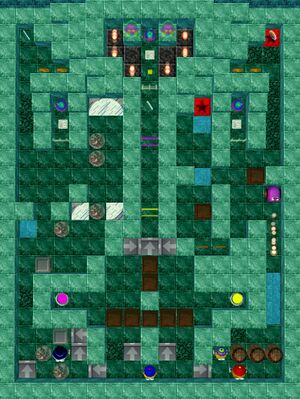
Gateway to the Rainbow World is the eighth and final level in Secret Passages. There are three sets of puzzles: a Powder Keg and Wooden Box one for Loof and Qookie, a Boulder and Steel Box one for Peegue, and a Wooden Box and button one for Stinky. Once all three puzzles are solved, the gateway to the Rainbow World opens for Stinky to enter, and the other three Stinkers give him words of encouragement as they exit. The level also cycles through various colors.
Walkthrough
Immediately switch to Qookie and push the right-most Powder Keg into the water. Otherwise, a Scouge will blow up the kegs and kill Loof and Qookie. Push the remaining kegs into the water switching between Loof and Qookie as needed taking care not to have the kegs destroyed by the Scouge. Move one Stinker across the bridge and have them push the Wooden Box all the way down and enter the alcove. Switch to the other Stinker and have both Stinkers push the box into the water. Push the other box into another pool of water then go across a collapsible bridge and collect a pair of Bonus Coins before collecting the Rainbow Coin on the red teleporter. Collect the other pair of Bonus Coins if they haven’t been collected already and switch to Peegue.
Have Peegue roll the Boulder on his left and collapse the nearby bridge. Roll the two boulders into the water. Next, push the Steel Box in Peegue’s starting area to just below the pool of water and the other Steel Box to the right into the corner. Collapse the bottom part of the bridge to the left of Peegue’s Rainbow Gate then roll the top-middle Boulder left and up into the water and the bottom-middle Boulder up, left, and up. Collapse the rest of the bridge and roll the remaining Boulders into the water using the ice and Steel Boxes. Have Peegue collect all of the coins on his side and then switch to Stinky.
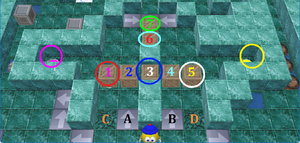
Stinky will need to position Wooden Boxes so that they hold down several buttons. The initial positions of the boxes are shown in the infographic. The buttons (with their respective colors) are represented by the circles; the boxes are numbered 1 to 7, with their intended destination colored by font. Stinky's moves should be as follows:
- Walk through right conveyor (B). Push box 4 up two tiles, then box 5 onto yellow button. Box 5 is set.
- Now push box 4 down one tile, then leave via right collapsible bridge (D).
- Walk through left conveyor (A). Push box 2 up two tiles, then box 1 onto purple button. Box 1 is set.
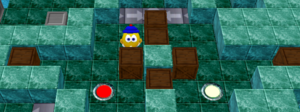
- Push box 2 down one tile. Now Stinky should end up in the same situation as the picture in the earlier section.
- Push box 3 right two tiles, onto the white button. Now box 3 is set.
- Push box 4 up one tile, then down one tile again.
- Push box 6 left two tiles, then push box 2 down and right onto the blue button. Box 2 is set.
- Push box 6 down two tiles onto the red button. Box 6 is set.
- Cross the left collapsible bridge (C), enter via right conveyor (B), then push box 4 up and left onto the cyan button. Box 4 is set; Box 7 didn't need to move.
If, by step 4, both collapsible bridges are (somehow) collapsed, then Stinky must follow a longer route as follows:
- Push box 6 right two tiles, and box 7 left one tile.
- Push box 3 right two tiles onto the white button, then box 4 up one tile.
- Push box 3 left and up one tile each.
- Push box 6 down two tiles onto the white button, then left four tiles onto the red button.
- Push box 2 up one tile, then box 7 right two tiles, then box 2 left one tile. Now boxes 7, 4 and 3 are aligned in a straight line on Stinky's right side.
- Walk around and push box 7 left onto the green button. Box 7 is set.
- Walk around and push box 4 right one tile and down two tiles onto the white button. Box 4 is set.
- Push box 3 up and left onto the cyan button. Box 3 is set.
- Push box 6 right two tiles onto the blue button. Box 6 is set.
- Push box 2 down two tiles onto the red button. Box 2 is set.
If either of these solutions have been followed correctly, all the gates should be open. Step onto the conveyor, collect the final Rainbow Coin, and have all four Stinkers exit through their respective Rainbow Gates.

