One Last Hurrah!
| One Last Hurrah! | |
 | |
| World | Full Circle |
| Playable Stinkers | Stinky, Loof |
| Rainbow Coins | 12 |
| Bonus Coins | 55 |
| Time | 15:00 (up to 18:00 with Alarm Clocks) |
| Texture | Wood |
| Background | Walls |
| Music Track | Track 2 |
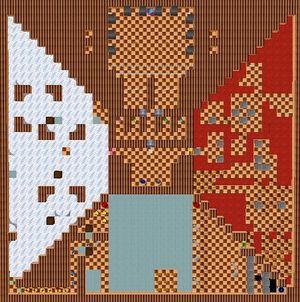
One Last Hurrah!, also called Control Room in Stinky and Loof in Wonderland, is the tenth and final level in Full Circle (ninth in Stinky and Loof in Wonderland, hence the name change). It is the final level in Return to Wonderland Classic Edition and the Classic Levels set in later versions.
Strategy
One Stinker must stay behind to operate the star-shaped Buttons in the Wonderland Control Room while the other goes through a series of 3 challenges similar to One Last For The Road from Wonderland. Considering the presence of yellow Chompers in the lower left room, it is preferrable for Loof to stay in the control room while Stinky braves the challenges; also the Chompers and Coilys can only be eliminated by UFO fire, thus making it necessary to complete the challenges in clockwise order.
Once all the Rainbow Coins from the challenge rooms have been collected, the other Stinker can enter the control room with both of them collecting the remaining Rainbow Coins. Once the Exit Gates have been opened, a horde of Chompers will pursue the duo, and special care must be taken to avoid them if the player wants to collect all of the Bonus Coins.
Walkthrough
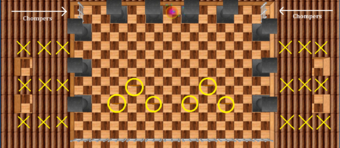
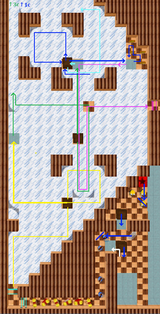
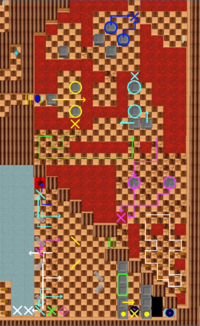
The labelled diagrams on the right show the detailed solutions for each section; refer to the right image for the Lava and Pool rooms, the left image for the Ice room, and the top image for the Exit room. Thick lines represent moves involving pushing an object, while thin lines represent non-pushing moves. Arrows should be followed in the order yellow (Y) → green (G) → light blue (B) → indigo (I) → purple (P) → white (W).

| |
 |

|
- Get both Stinkers out of the Electros trap. Move Stinky next to the yellow gate.
- Move Loof into the Control Room and onto the yellow timer button.
Lava room
- (Y) Move Stinky through the yellow gate to the Lava Room. Push the steel box right into the lava. Then push the two nearby boxes circled in yellow to the yellow "X", building a bridge over the lava.
- (G) Follow the green path to collect the nine bonus coins.
- (B) Push the upper box circled in blue into the lava above. Next, follow the blue arrows to push two steel boxes aside, then push the other circled blue box to complete the bridge.
- (I) Step on and off the collapsible tile at the indigo "X" to collapse it. Then use the two boxes circled in indigo to rebuild the bridge at the same location, and collect the two rainbow coins.
- (P) Now follow the upper purple path, and push the purple circled box on the left to the purple "X". Walk on the solid tiles to the right of the other box, then push it carefully along the lower purple path to the purple "X" as well, completing the bridge to the next room.
- (W) Walk along the white path to collect the remaining bonus coins in this room. Standby near the green gate.
Pool room
- Move Loof onto the green timer button.
- (Y) Move Stinky through the green gate. Place the two adjacent reflectors to their marked positions (yellow diagonal lines).
- (Y) Trap the Kaboom! at the bottommost position to open the UFO's shooting path. (Now watch out for UFO fire whenever you are on the bottom row!)
- (G) Step on and off the collapsible tile at the green "X", then use the two steel boxes circled in green to fill it.
- (B) Push the topmost reflector 2 tiles up, and the bottommost reflector 1 tile down. Briefly wait at the purple diamond position (and retreat), until UFO fire destroys the three Chompers.
- (I) Now push the topmost reflector into the red teleporter (or you can simply push it into the water), and follow it through to the pool's left side.
- (I) When the Coilys are clear, push the upper wooden box into the water, then quickly push the lower wooden box down 1 tile and the reflector left 3 tiles. This would trap the Coilys behind the reflector. Return via the red teleporter.
- (P) Push the topmost reflector down 1 tile, then step into (and retreat from) the purple diamond position, until UFO fire destroys all the Coilys.
- (W) Now to collect the bonus coins (watch out for UFO fire). Push the bottommost reflector left into the water. Then push the topmost reflector left into the water, and then the reflector below you down to the bottom row. Walk around and push this one left into the water.
- (W) Move the last two reflectors at the yellow positions one by one to the blue diamond position, then left into the water to complete the bridge. Dodge to the side to avoid UFO fire whenever necessary. Collect the bonus coins.
- Go through the red teleporter, and push the last wooden box here to build the bridge to the Clocks. Collect the Clocks and standby near the light blue gate.
Ice room
- Move Loof onto the light blue timer button.
- (Y) Take Stinky through the light blue gate and onto the ice. Push the wooden box up (follow behind it) and then left, until it fills a water tile.
- (G) Step up and then left to collect three rainbow coins at the very top of this room. Once back on solid tile, step down and then push the wooden box up into the water tile. Follow behind it.
- (B) Step left (pushing the box left of you) but don't follow it; instead step down, then follow the ice to collect the last rainbow coin at the very top of this room.
- (I) Upon returning to solid tile, push the wooden box up (follow behind it) and then right, until it fills a water tile. Follow behind it and collect the bonus coins.
- (P) Retrace your steps along the purple path, and wait to the left of the purple gate.
- Check that you have collected 6 rainbow coins and 31 bonus coins by this point; if not, consider restarting the game or from an earlier save point (SnL).
Exit room
- Move Loof onto the purple timer button. Take Stinky through the purple gate.
- Get both Stinky and Loof into the exit room, each taking a different side behind the Control Room. Collect five rainbow coins and standby for the exit. Save the game (on SnL) if need be.
- For the Stinker that is collecting the final rainbow coin, upon collecting it (which will release the hidden Chompers), head straight for the exit if possible to not endanger the other Stinker.
- Switch to the last Stinker. Dodge the Chompers, collect all remaining bonus coins (marked in yellow), and exit.